Vinyl plank flooring is a popular choice for homeowners due to its durability, affordability, and easy installation. However, changing the direction of your flooring between rooms can be a tricky task. In this guide, we will walk you through the steps, offer expert insights, and answer frequently asked questions about changing the direction of vinyl plank flooring between rooms.
Understanding the Importance
Vinyl plank flooring offers the flexibility to create a unified look throughout your home. However, changing the direction between rooms is essential for various reasons:
Achieving a Visual Distinction Creating a visual distinction between different living spaces, such as the transition from the living room to the kitchen, can be aesthetically pleasing. By changing the direction of your vinyl plank flooring, you can achieve a clear separation between areas.
Optimizing Layout Sometimes, the layout of your home may necessitate a change in the direction of your flooring. This is especially true in open-concept spaces, where flooring direction can help define areas.
Minimizing Waste Changing the direction of vinyl plank flooring can reduce waste during installation. It allows you to use the material efficiently and minimizes the number of cuts required.
Enhancing Structural Integrity Changing the direction of the planks can help improve the structural integrity of your flooring. By running the planks perpendicular to the floor joists, you ensure better support and stability.
Assessing the Space
Before diving into the installation process, it’s crucial to assess the space where you plan to change the direction of your vinyl plank flooring.
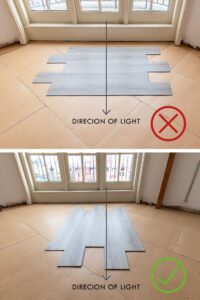
Determining the Starting Point Identify the starting point for the new direction. This is usually in a central location where the change will be most visually appealing.
Measuring the Area Measure the entire area where you want to make the change. Accurate measurements will help you calculate the amount of flooring material needed.
Checking Subfloor Condition Examine the condition of the subfloor. Ensure it is clean, dry, and level. Any imperfections may affect the final result, so address them before proceeding.
Gathering Necessary Tools and Materials Gather all the tools and materials you’ll need for the installation, including vinyl plank flooring, adhesive, a utility knife, a measuring tape, and a straight edge.
Changing Direction of Vinyl Plank Flooring Between Rooms
Installation Process
Now that you’ve prepared your space, it’s time to start the installation process:
1. Remove Existing Flooring If there’s existing flooring in the area, remove it carefully. Ensure that the subfloor is clean and ready for the new installation.
2. Lay the First Row Begin by laying the first row of planks along the starting wall, ensuring they are parallel to the wall and evenly spaced. Use spacers to maintain an expansion gap.
3. Install Subsequent Rows Continue laying the planks row by row, using adhesive as necessary. Make sure the planks are snugly fit against each other, with no visible gaps.
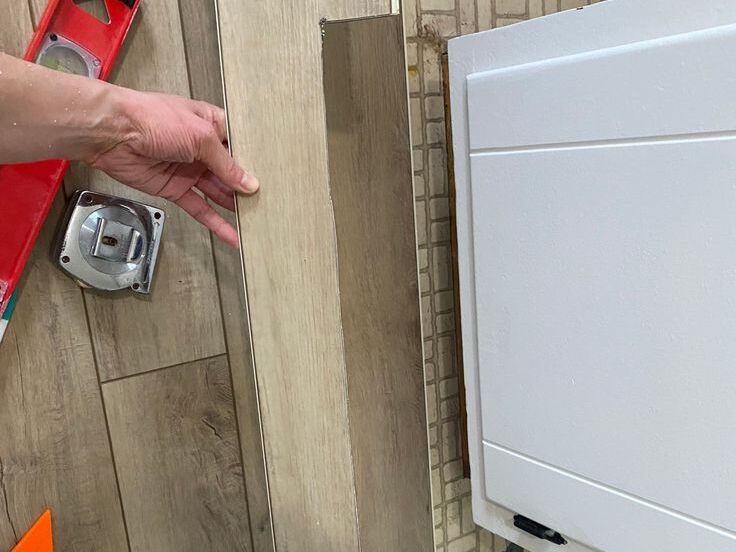
4. Make Cuts When Needed When you reach the end of a row, you may need to make cuts to fit the planks properly. Use a utility knife and a straight edge for precise cuts.
5. Maintain a Staggered Pattern To achieve a professional look, stagger the seams between planks. This helps distribute the weight and adds to the structural integrity.
6. Secure Transitions When transitioning between rooms, use transition strips to create a seamless finish.
7. Final Inspection After the installation is complete, inspect the entire flooring for any imperfections. Make any necessary adjustments before the adhesive sets.
FAQs
How do I choose the right vinyl plank flooring for my project? Select vinyl plank flooring that matches your style and preferences. Consider factors like thickness, wear layer, and design.
Do I need professional help for changing the direction of vinyl plank flooring? While it’s possible to do it yourself, professional installers can ensure a flawless result. It depends on your confidence in your DIY skills.
Is it necessary to acclimate vinyl plank flooring before installation? Yes, acclimating the flooring to your home’s temperature and humidity is essential to prevent issues like warping.
What tools are essential for a DIY installation? You’ll need a utility knife, measuring tape, straight edge, spacers, and adhesive suitable for vinyl plank flooring.
Can I change the direction of my vinyl plank flooring over existing flooring? It’s recommended to remove existing flooring for the best results, but consult with a professional for specific cases.
What maintenance is required for vinyl plank flooring after installation? Regular cleaning and protection from sharp objects are essential for maintaining the beauty and longevity of your flooring.
Conclusion
Changing the direction of vinyl plank flooring between rooms is a manageable DIY project that can significantly enhance the aesthetics and functionality of your living space. By following the steps outlined in this guide and considering expert tips, you can achieve a seamless and professional-looking result.